

 GitHub

 www.youtube.com
Example Repo in https://github.com/maxgoffman/WordPressWithWPCli
Oh the bad old days: you wanted to develop something with PHP then you needed the appropriate version, and maybe Xampp, Mamp or Wamp. A dependency manager like Composer would be essential to install all the goddamn dependencies. Perhaps you work with a framework like Symfony or Laravel, or CMS like WordPress. What if your tech stack is javascript flavored? You probably need Node, NPM or a different package manager like Yarn. Perhaps Webpack or Parcel for bundle management. Babel? For sure, unless you plan to do something very basic (like something on the Vainilla or JQuery level) you’ll need to transpile the code. What about a front end framework like Vue, React or Angular? The list goes on and on, and that doesn’t include persistence: most of the time you are going to need a database like MySQL or MongoDB.
All this crap needed to be installed manually in your computer eating disk space. Running the programs also took memory and CPU power. If you’re using your home computer to work (like I do) this can be pretty annoying. That’s until Docker came along.
What is docker?
Wikipedia says that it’s “a set of platform as a service (PaaS) products that use OS-level virtualization to deliver software in packages called containers”. Now, unless you are familiar with coding, all this techno mumbo-jumbo probably means nothing to you. So I’m going to tell you a short story:
A couple of weeks ago, I was tasked with the unfortunate job of reviving an old project. The project didn’t have Docker or any kind of containerization implemented. As I glanced through the installation instructions, I realized that I had to install all kinds of old dependencies and packages like Less, Bower, AngularJS, PHP 5, and weird deprecated libraries. Also, the installation instructions were definitely wrong. It was hell. So, after asserting everything that was needed, I set on dockerizing the project. In a couple of hours, I turned that long and confusing manual into a 2 lines instructions manual:
- Prerequisites: Docker and Docker Compose* (more on this later).
- To install, use docker-compose up –d.
So, what is Docker? It’s a tool that changes long and tiring deployments into a 5 minute installation. I’ve been using Docker for quite some time, so I’ve been aware of how good is Docker for Continuous Integration and Deployment environments. But, it wasn’t until this experience that I realized that the greatest thing is how it streamlines your development process, saving time in useless and meaningless tasks.
How it works?
Docker has these things called Images. These are instructions to build a Virtual Machine that is used to run a program. Also, Images are extensible, from a basic Image you can add stuff. So we can have very basic Images and very specialized. And believe me: there is an image for every need.
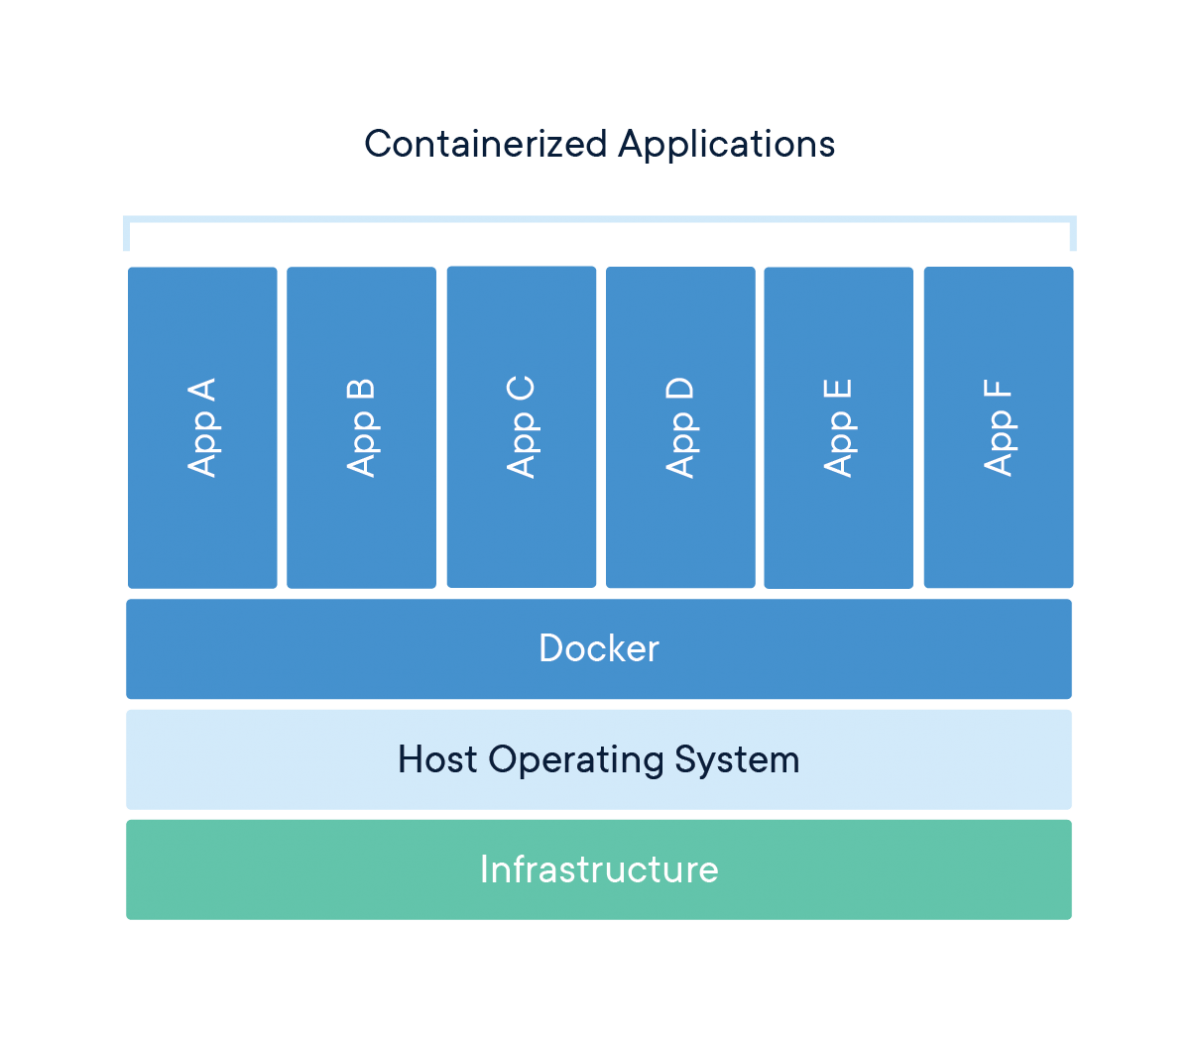
Source: https://www.docker.com/resources/what-container
When you instruct Docker to run an image, it turns into a Container. A container is the Virtual Machine per se. Because you can make a container interact with other containers, these are also in turn very flexible. This is both really amazing and powerful: for example, it means you can have a Virtual Machine running a Web Server and another running a Database. You can then run these on demand in a cloud service, or run them all in your local computer. Best of all, is that containers are lightning fast.
A practical example
The best example I can think of for showcasing the practical use of Docker is this blog. That’s right, this tool is so useful that even this blog is running on Docker. To write an image, you need to define the instructions in a Dockerfile. Let’s take a look at the Dockerfile I wrote for this blog:
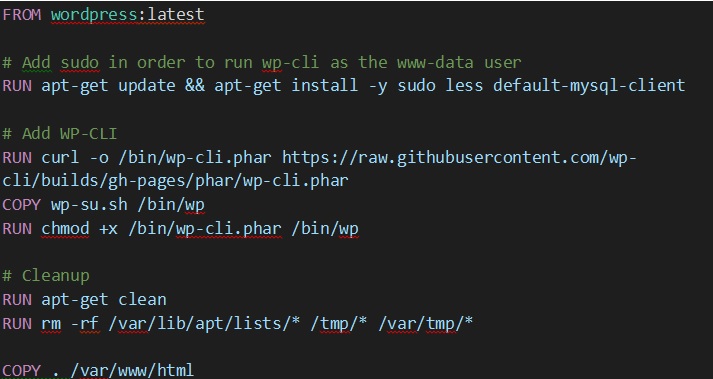
If you’re not familiar with bash scripting this may seem complex. However, it’s not that difficult to understand the core. I’m just using 3 docker commands: FROM, RUN and COPY.
- Using FROM, I start by extending WordPress official image.
- Then, I RUN a command that triggers a download of WP Cli (the WordPress official command line tool), and install it.
- Finally, I COPY my project files into the webserver folder, so they’re hosted “in the internet”.
That’s it. That’s the basic concept. Now we can tell Docker to run this image and it’ll create a container.
Docker Compose
Most of the time, one container alone isn’t enough. For example, to run WordPress you need a container with a webserver that has WordPress installed. But you also need a container that has MySQL, which is the database were WordPress stores all the persistent data.
Making containers interact only using Docker can become annoying. That’s were Docker Compose comes along: it’s a tool to define and run multi container applications. Using a yaml structured file, the configuration and properties of a group of containers can be defined, and Docker Compose will take care of telling Docker how to run these containers. Returning to the example of this blog this is the configuration I use:
services:
db:
image: mysql:5.7
volumes:
- data:/var/lib/mysql
restart: always
environment:
MYSQL_ROOT_PASSWORD: "somerootpassword"
MYSQL_DATABASE: "adatabasenameofyourchoice"
MYSQL_USER: "someuser"
MYSQL_PASSWORD: "somepasswordforthatuser"
wordpress:
depends_on:
- db
build: .
container_name: ${COMPOSE_PROJECT_NAME}
restart: always
environment:
WORDPRESS_DB_HOST: "db"
WORDPRESS_DB_USER: "someuser"
WORDPRESS_DB_PASSWORD: "somepasswordforthatuser"
WORDPRESS_URL: "http://localhomeurlofyourchoice"
WP_CLI_CACHE_DIR: "/var/www/html/cache"
volumes:
data:
The basic concept Docker Compose is doing here is the following:
- Tell Docker to create 2 containers: db and wordpress
- Container db is based on Docker MySQL 5.7 image.
- Container wordpress is created from the Dockerfile I shared before.
- Container wordpress depends on the db container.
- Container db shares it’s data with the rest through the data volume.
Running the command “docker-compose up”, and everything will start up automagically.
Fast and neat, with this if you’re a developer in a few minutes you can have any kind of system running.
We’ve seen the Pros. What about the cons?
That’s the best part: there are no Cons! Well… to be honest, maybe a few, very relative cons: you may have heard that Docker is for Linux. That is the unfortunate truth. Docker runs natively on Linux. Don’t get me wrong, Linux is a great OS… to work with. The first time I used Docker, I installed an Ubuntu to get it running. But this can be pretty frightening for newbies. In spite of that, the good news is that Docker can run on Windows and Mac, and it can run almost as well as in Linux. On Windows 10 professional installations it can run semi natively using Windows WSL (Windows Subsystem for Linux). Since 2020, it also works on the newest Windows Home installations.
If you’re stuck developing with an older computer you can use Docker Toolbox, which runs an Oracle Virtualbox Docker Machine with Tiny Core Linux and docker installed inside to make it work. I’m still using that and it works great. At first, I had some trouble with how slow the performance was with Windows shared folders, but then I customized my Docker Machine with Docker Compose, an extra virtual disk and some bash commands of my own creation. Before running a Docker container, I run one of these commands to copy the files from the Windows Shared Folder to the internal virtual disk, then the same command creates container from there. With those instructions, I could achieve a similar performance than in Linux.
The second con could be that if you want to take advantage of Docker you need to know Unix/Linux Bash scripting. Well, if you’re a professional developer here is my advice: stop crying and learn Unix bash scripting.
Anyway, I hope you enjoyed reading this as much I enjoyed writing it!
